The WordPress Block Editor is like a playground for your creativity, giving you the tools to build posts that look professional and are a joy to read. This step-by-step guide will show you how to harness the full potential of the Block Editor—without any coding or confusion. Let’s dive in and create a beautiful post together!
What is the WordPress Block Editor?
First things first: What exactly is the Block Editor? It’s an innovative way to create content in WordPress. Instead of writing your entire post in one long text box, the Block Editor breaks it up into blocks—each block represents a distinct piece of content. Think of it like building a post with Lego pieces! Each block can be a paragraph, an image, a video, a quote, or even something more interactive like a button or an embedded tweet.
This approach gives you more control, flexibility, and creativity with how your post looks and feels. It’s intuitive, simple to use, and you’ll be amazed at how easy it is to arrange everything exactly the way you want.
Step 1: Access the Post Editor
Let’s get started!
- Log into WordPress: Head to your site’s admin dashboard by visiting yoursite.com/wp-admin.
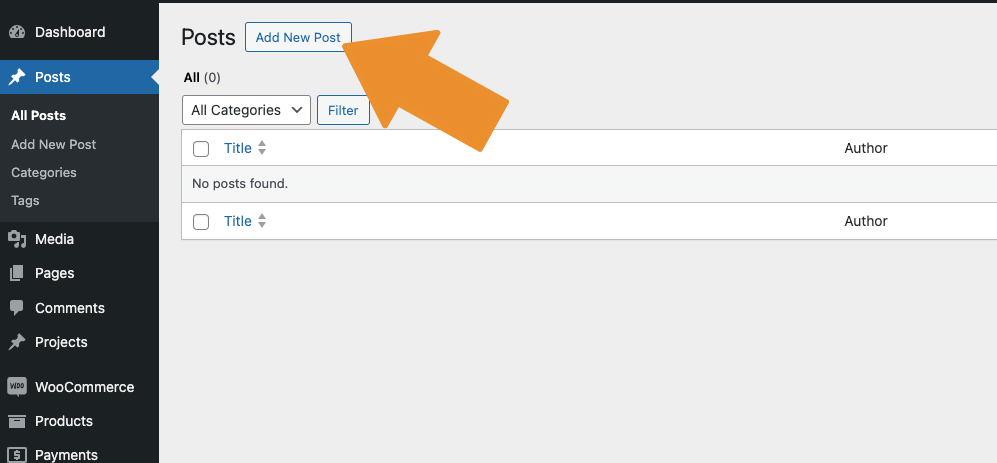
- Go to Posts > Add New: On the left-hand menu, you’ll see a section labeled “Posts.” Hover over it and click on Add New. This opens up the Block Editor where the magic happens.
Step 2: Add Your Title
The title is the first thing readers see, so let’s make it catchy and informative! The title field is at the top of the editor. Click into it and type a title that grabs attention.
If you’re writing a blog post about productivity, you might choose a title like “5 Game-Changing Tips to Boost Your Productivity Today.” You could also add a relevant image right below the title, like a photo of a desk with a cup of coffee, a planner, and a laptop.
Step 3: Add Your First Block – A Paragraph
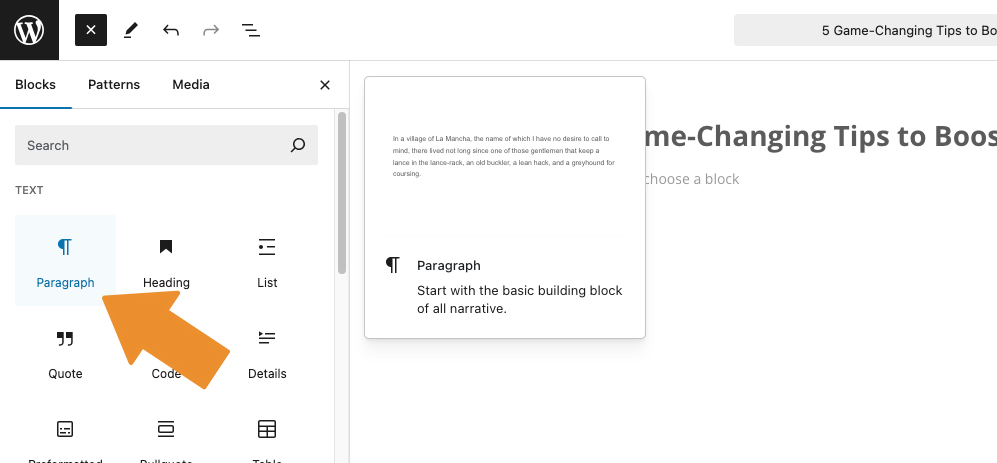
Now that we have our title, let’s start filling in your content. The Block Editor starts with a paragraph block by default. You’ll see a + symbol that invites you to add a new block. Click on that, and you’ll see a list of all available blocks.
- Click the “+” icon to add a new block.
- Select the Paragraph Block (it’s the default choice).
- Start typing your content!
Let’s begin with an intro. Here’s a sample paragraph:
“Productivity isn’t just about working harder—it’s about working smarter. With the right strategies, anyone can overcome procrastination and get things done. In this post, we’ll cover five simple but powerful tips that can help you take control of your workday and maximize your output.”
Step 4: Create Subheadings to Organize Your Post
Breaking up your post into smaller sections with clear, catchy subheadings makes it easier for readers to navigate. To add a subheading:
- Click the + button again.
- Choose the Heading Block.
- Choose the heading size (H1, H2, etc.)—typically, H2 works well for subheadings, and H1 is reserved for your post title.
Sample Heading:
Tip #1: Start Your Day with a Plan
Step 5: Add Some Visuals – Image Blocks
People love visuals! Adding images can break up long paragraphs, illustrate your points, and keep your readers engaged.
- Click the “+” icon to add a new block.
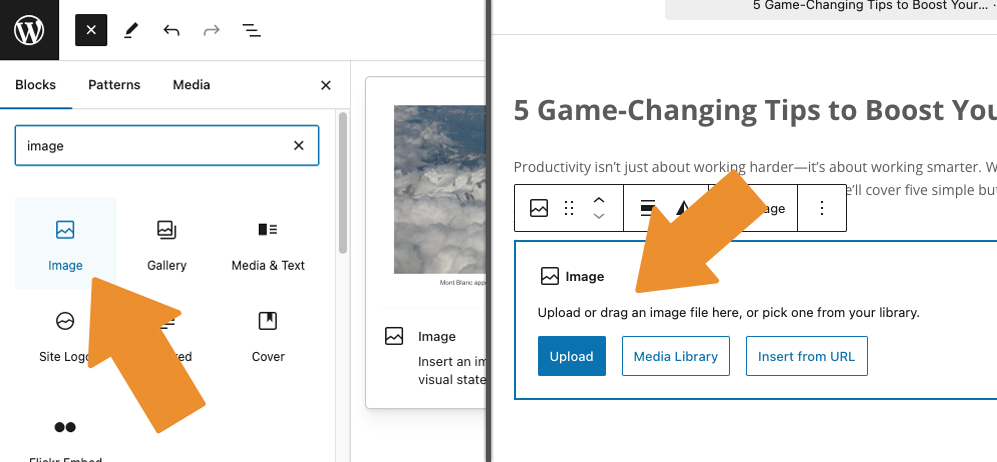
- Select the Image Block.
- Upload an image from your computer, or if you’ve already uploaded one to your media library, choose it from there.
Step 6: Add a List Block for Tips
Lists are a great way to present multiple ideas in an easy-to-read format. Whether it’s a numbered list or bullet points, adding a list is simple:
- Click the “+” icon and choose the List Block.
- Start typing your tips or steps, pressing Enter after each one.
Sample List Prompt:
- Prioritize Your Most Important Tasks
- Take Regular Breaks
- Turn Off Distractions (phone, social media, etc.)
- Set Clear, Achievable Goals for the Day
Step 7: Customize Layout with Columns
Want to create a side-by-side layout? Columns are perfect for that.
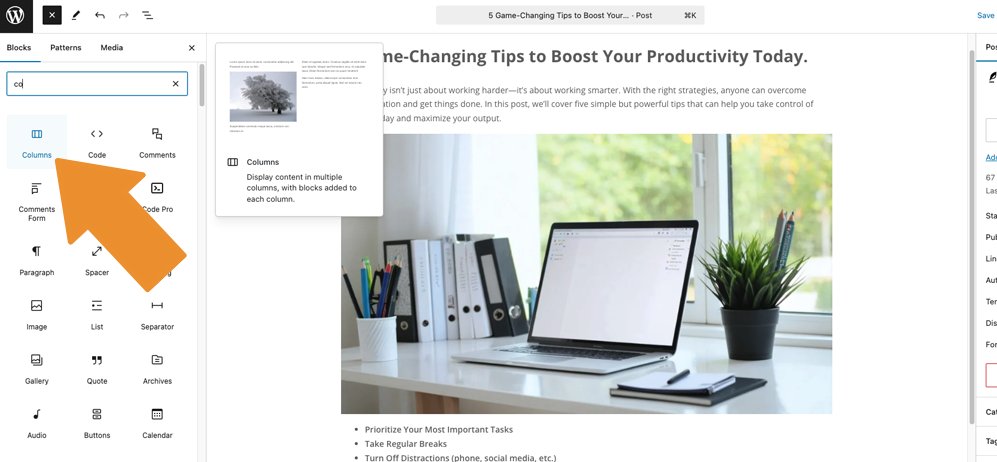
- Click the “+” and search for the Columns Block.
- Select the layout (usually two or three columns works best for most posts).
- Add content (images, text, or any other block) to each column.
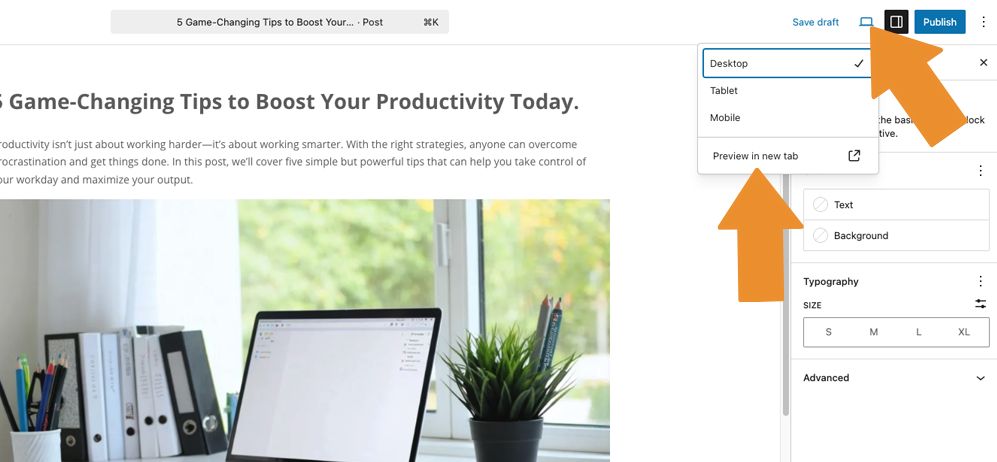
Step 8: Preview and Publish
You’re almost there! Before publishing your post, you’ll want to see how it looks. WordPress lets you preview it so you can make sure everything is in place.
- In the top-right corner, click Preview to see your post.
- Look for any formatting issues, check that all your images are showing up properly, and make sure your links work.
Once you’re happy with how everything looks, click Publish!
You Did It!
Look at you, creating beautiful blog posts with the WordPress Block Editor! You’ve learned how to craft your content with headings, paragraphs, images, lists, and more, all while keeping things organized and engaging for your readers.
Remember, the Block Editor is your creative playground. Experiment with different blocks, try out various layouts, and make your posts uniquely yours. You don’t need to be a tech expert to make your site look fantastic!
